Five factors for good homebrew lager


When I started homebrewing in 2018 there is one statement I heard over and over again: "Homebrewing lagers is hard (leave it to the more experienced)". It's not and it doesn't have to be. This post summarises my experience of brewing over 100 lagers in five factors that I have found to be the most important. As with most posts on this blog, this is mostly opinion, but I usually try to represent what I perceive as consensus. I'm very open to being challenged by contradicting facts though.
You can find a tl;dr checklist at the end of the article.
Content
Factor 1: Controlled Fermentation
Factor 2: Yeast
Factor 3: Sanitary practices and oxygen-free cold side
Factor 4: Water chemistry
Factor 5: Balanced Recipes
Addendum: What wasn't mentioned
Factor 1: Controlled Fermentation
Consistency
The most important factor for brewing a decent lager is to control for consistent fermentation temperature. If the beer is sitting in your garage and has large temperature swings over day and night it will likely stress the yeast and will result in a subpar brew. Choose a place with consistent temperature. Ideally, you would have a fermentation chamber, which usually is an externally controlled fridge or freezer. A new small fridge that fits a 30l plastic fermenter costs about 150 Euros (in Germany) and might probably be the best price-performance ratio you can get. An external temperature controller like the popular Inkbird is another 50 Euros. With a fermentation chamber, you will make sure that the temperature stays steady even when the fermenting beer produces heat. With a cooling device, you also get the opportunity to cold crash your beers.
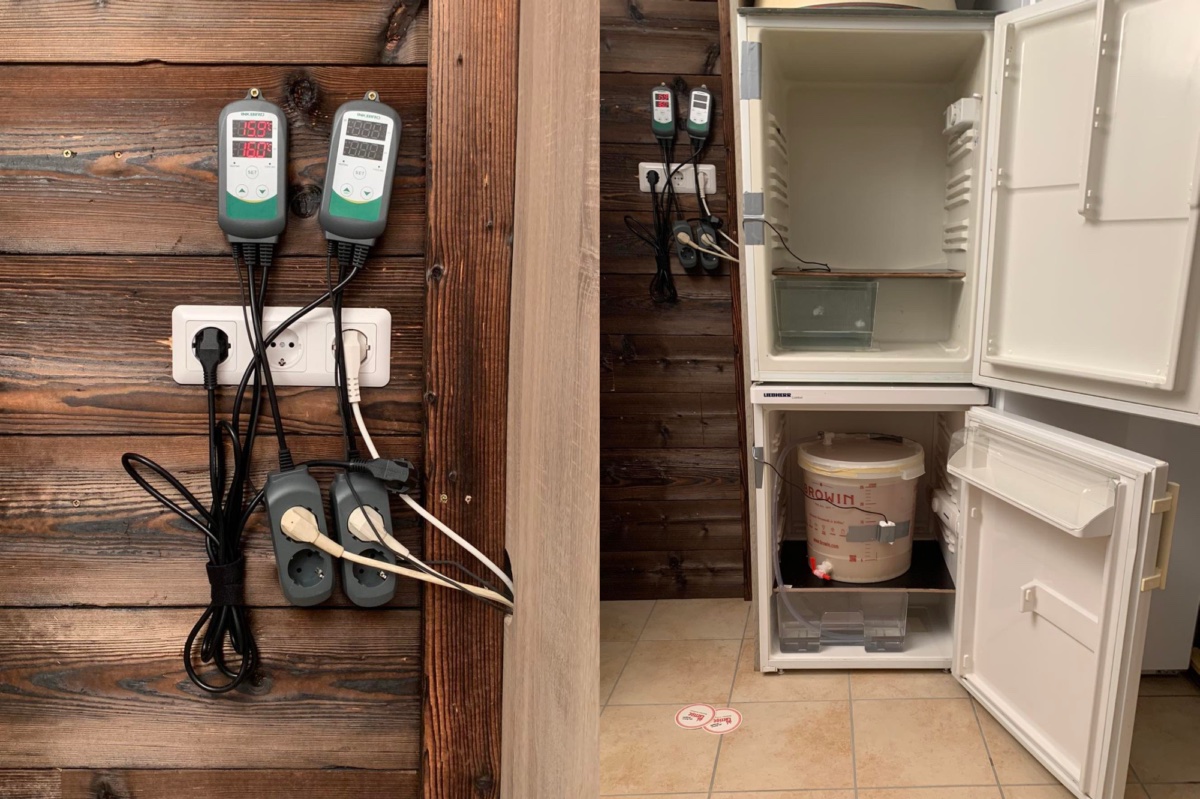 Example of a fermentation chamber. Two fridges are controlled externally with an Inkbird. (Photo by Tommy Rölfs - he makes great beer with a bucket - no shiny steel needed.)
Temperature
As important as the consistency is the temperature itself. Lager beers are usually fermented cold and yeast strains have been conditioned to work optimally under lower fermentation temperatures. The lower fermentation temperature is also part of the reason why lager yeasts are considered neutral. I like to ferment cold. My usual fermentation temperature is around 9-10°C. There is a lot of controversy about if a lower fermentation temperature matters, or if 12°C, 14°C or even 20°C is fine, in the homebrew community. I think it does, but explaining why is probably worth a separate post. The three best lagers (commercially from Franconia) I had were all fermented at low temperatures. You don't need very cold fermentation temperatures to make good lager, but from my experience all the excellent lagers had them. With that being said: I would recommend a fermentation temperature of 10°C if you have enough yeast (see next factor). If you want to save a bit on yeast 12°C is also fine.
Cooling wort
This subpoint is technically not related to the controlled fermentation but I don't want to leave it out. You need to actively cool your wort. This usually happens with a heat exchanger in direct contact with the wort. The common options are immersion chillers (easiest), counterflow chillers or plate chillers. Putting the bucket full of hot wort in the fridge is not sufficient. Ideally, your groundwater is very cold (or you have another cold source) so that you can cool directly to pitch temperature which is the same as the fermentation temperature for my brews. If you can only get to 18°C your fridge will have to do the rest, but that should be fine. Just be sure that you're ready to pitch the yeast once it's cooled down. Pitching the yeast and then cooling further down is not recommended as it induces stress on the yeast.
A usual fermentation process
For my average lagers, I pitch at 9-10°C. The yeast should show signs of activity after at most 24 hours. For me, that's usually the first slow bubbles coming from the blow-off (this only works as an indicator if CO2 can't escape elsewhere). From there on I let it ride at 9-10°C until around 50% of the fermentation is done (If my beer is expected to go down from 12.5°P to 2.5°P then 50% is at 7.5°P not at half the OG) and then start to increase the temperature. I let the beer free rise to 12°C, then a day later let it free rise to 14°C and once I see the fermentation is about to die down I let it rise to 18°C for 3-4 days followed by a cold crash.
I monitor my fermentations with a Tilt. It has some quirks, but generally, it's a good indicator of fermentation status. Knowing the exact status of your fermentation is hard, but over time you'll learn how long your fermentations will take. Mine usually take 6-10 days for normal-strength beers. So day 4 or 5 would be a good time to raise the temperature to 14°C and then when the airlock bubbles die down let it rise to 18°C.
Below is a graph of such a fermentation.
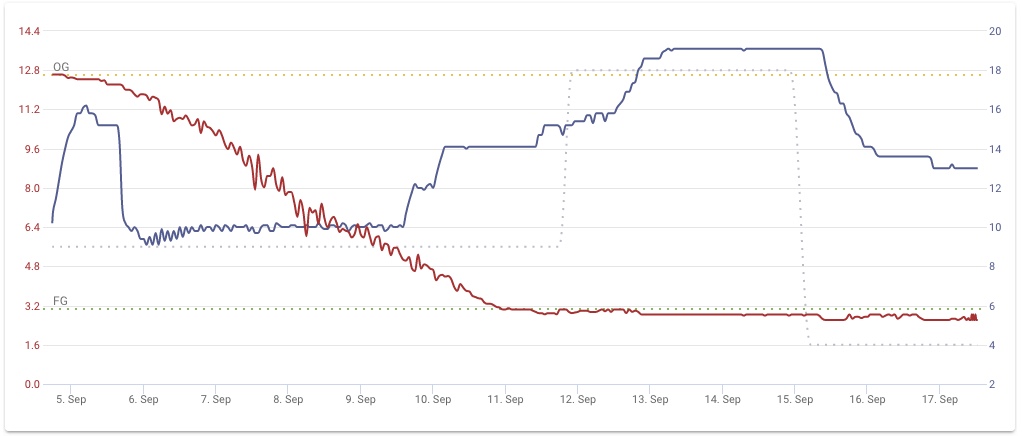 Be aware that the temperature is a bit off at the beginning and ending of the fermentation since the top level of the wort sits over the cooling ring of my fermenter and the cold wort falls down during cooling, so there is a thin warmer wort layer on top where the tilt is getting the data from. Once the fermentation is starting to get active the wort mixes so that the temperature is accurate and as it finishes it starts layering again.
Factor 2: Yeast
The other part of healthy fermentation is healthy yeast. For a lager beer you need more yeast than for an ale, roughly twice the amount of cells. The standard pitch rate is 1.5 billion cells per degree Plato and liter wort. So for a standard 23l homebrew lager with 12°P, this would be 414 billion cells.
Liquid yeast & starters
For brewing a lager you usually will need to make a starter to have enough cells. There are various yeast starter calculators out there, for example, the one from brewersfriend.com. Starters should be done with a magnetic stir plate. If you're up to it you can build a cheap one by yourself from a computer fan.
If the yeast is older (probably even over the best-before date) you should build the starters in two steps. The first step should be 500ml wort and once that one is at high kräusen add more wort. Depending on the yeast's health it can take 12-48 hours to reach high kräusen. With old yeast it is sometimes hard to see activity. If the color becomes lighter and the starter becomes milkier it should be on a good way. You should usually see at least some bubbles on top of the starter.
Now the question is if the starter should be decanted or not. If you pitch the starter directly I would try to time it with high kräusen, you probably need less yeast because it's perfectly vital. I prefer decanting to not dilute my wort with potentially oxidized beer. The starter I make is a bit bigger and I let it cold crash for ~3 days and pour off as much as possible without pouring off too much yeast.
In terms of starter wort I recommend non-alcoholic beer from stopped fermentation (should read ~4 grams of sugar on the nutrients) with a pinch of yeast nutrients and a tsp of regular sugar. No need to boil and cool down, just sterilize the bottles before opening, degas in the flask and go.
Make sure that you aerate the wort when using liquid yeast.
Dried yeast
 W-34/70: The most widespread lager yeast in the world. It's the result of letting the 34th strain in the catalog of Weihenstephan run for some generations in a brewery in the year 1970.
The easiest option is pitching dried yeast. All I can say is you should follow the recommendations of the manufacturer. For Fermentis W-34/70 that's going to be rehydration and for Lallemand Diamond Lager it's just sprinkling on the wort. For the lager yeast Allstar W-34/70 a pitch rate of 1g/l at 12°C is recommended (I believe the test was done with 14°P OG beer, so use more for high OG beers). That usually results in 2 packages for a ~22l size batch. If you go for 9°C the pitch rate is 2g/l so 4 packages. I think 3 packages at 10°C is a good middle ground.
Lallemand has a pitch rate calculator and they want you to use 3 packages at 12°C and 12°P.
If you're cheap and want to use less yeast go for a bit higher fermentation temperature rather than underpitching.
No need to aerate the wort when using dried yeast.
Harvested yeast
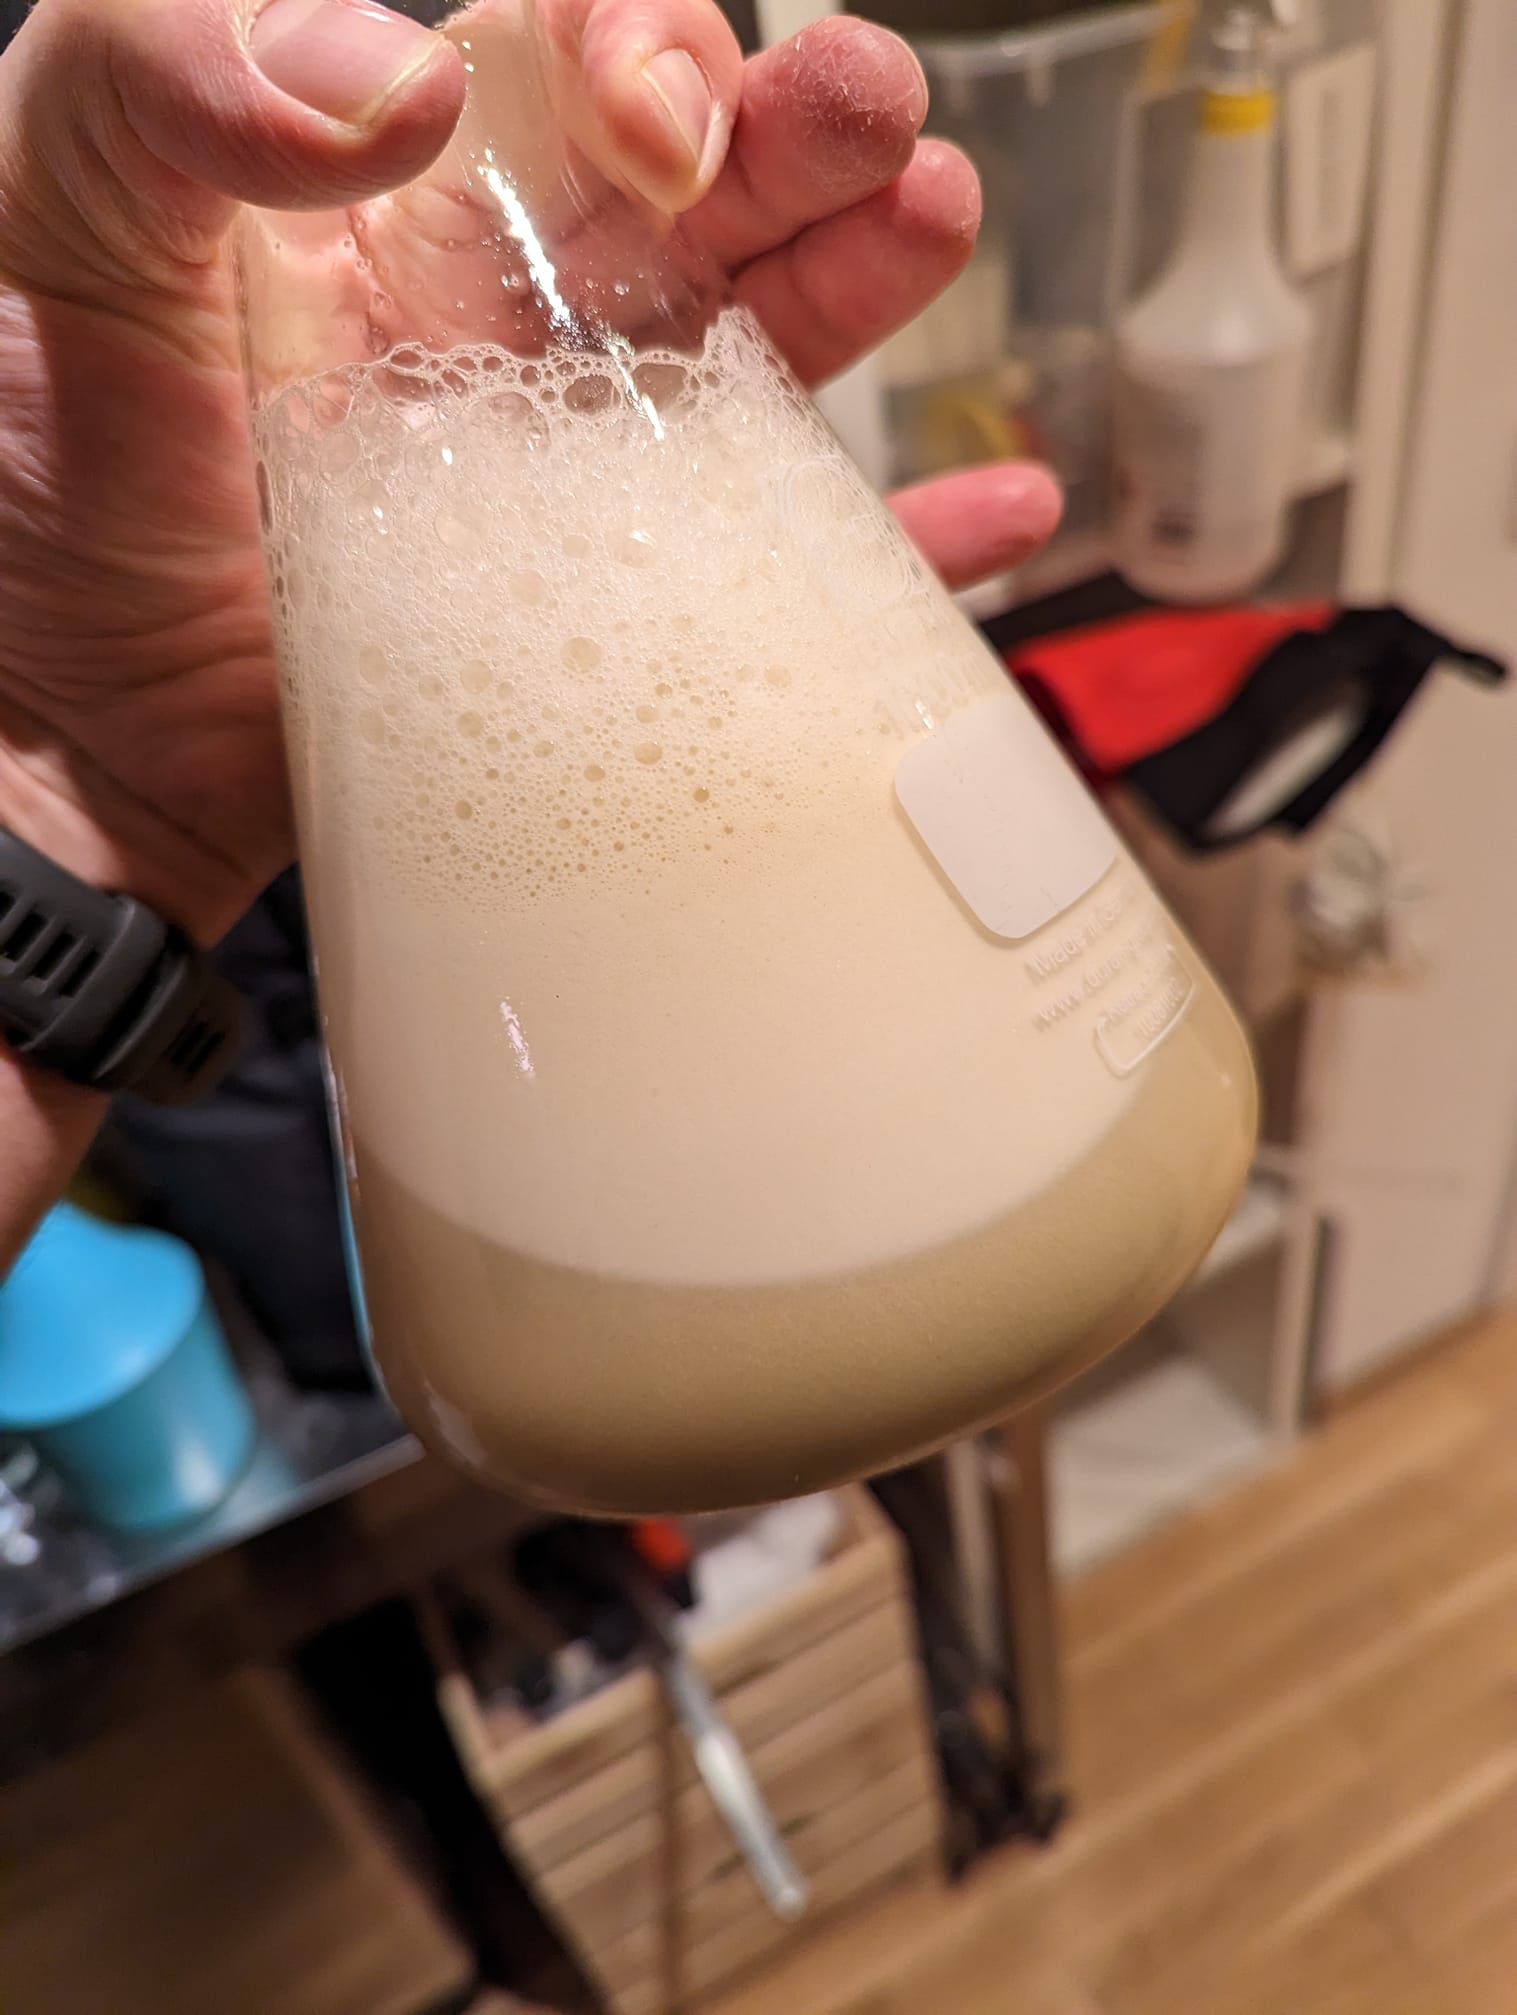 Approximately 500ml freshly harvested yeast. Contains trub and beer but plenty of vital yeast.
Harvested yeast is my favorite. It's cheap and vital. If you brew multiple lagers in a row this is the way to go. After your first batch has completed fermentation harvest the yeast. I have a yeast dump valve and to get yeast for the next batch I wait until fermentation is just complete (the fresher the better), dump the first bit that comes out and then get ~500ml of trub yeast mix. It doesn't look pretty and usually it's quite liquid. I directly pitch it to the next batch. Since it's so vital you're fine with fewer yeast cells than normal. I usually add some yeast nutrients in my batch when I use harvested yeast, also you need to aerate the wort.
If you don't have a dump valve on your fermenter you can rack the beer off the yeast cake and then scoop it out with a sanitized tool. The older the yeast is the more you gonna need. You can store it in a sterilized jar in the fridge (don't screw on the lid too tight). If it's older than 2 weeks build a starter from the harvested yeast. But for this case I would recommend to make a bigger starter instead of harvesting and saving 200-400ml of the starter in a jar for the next starter, because there is less trub in the starter.
Factor 3: Sanitary practices and oxygen-free cold side
This factor is not only important for lagers but for everything else that you're brewing. Your equipment should be clean. Everything that touches the wort after cooling from boiling should be sanitized. You don't need to go full overboard with cleaning rituals but you don't want to introduce unwanted bugs to your beer. Telling from experience everything in lines and that is hard to reach should be cleaned with attention. Hoses, keg couplers and things like ball valves. Throw your clean stuff in a bucket of Starsan if you're going to touch beer with it. It's simple.
You also need to make sure that you do not introduce oxygen to your fermented beer. This is the quickest killer of flavor. Oxidized beer doesn't necessarily taste like cardboard, taste often just becomes lifeless. Your beer could have been maltier. Your beer could have had brighter hop flavors.
If you bottle condition make sure that you fill your bottles with a bottling wand. They are very cheap and make sure you don't introduce much oxygen. Refrain from batch priming by stirring in sugar in your whole batch, or extra transfers into bottling buckets.
If you keg your beer I recommend cleaning the keg, filling it with water to the brim and then using CO2 from fermentation to empty the keg. It's also possible with fermenters that don't hold much pressure. This way you can be sure there's only CO2 in the keg. When transferring the beer to the keg use the beer port of the keg and connect the gas port to the top of the fermenter to do a closed transfer. The fermenter needs to be placed higher than the keg of course.
If you want to cold crash your beer I recommend that you can close off the fermenter and add CO2 from a tank, or have a large headspace filled with CO2. Otherwise, you'll inevitably suck oxygen into the head space. CO2 doesn't form a protective layer above your beer. Skip the cold crashing in the fermenter and lager your bottles or keg cold and you'll get pretty clear beer.
Factor 4: Water chemistry
This topic largely depends on your source of water. It can be feasible to brew very good lagers with tap water. You should get a report from your water provider, which can usually be found on their websites. If it's not too hard and doesn't go overboard with ions it can be suitable to brew good lagers. If it's very hard and has a lot of ions you need to reduce the hardness and the ions. This can be done by blending with store-bought (distilled), reverse osmosis or with a mixed bed ion exchanger.
It can be complicated to fully understand this topic and I will probably make a post on this later. For starters, I would recommend that you let your brewing software do the work for you. In Brewfather you can enter your source water profile (consult their documentation when you're having questions) and your target profiles. For most lagers (gold-amber color, with hop character) I go for 40-80ppm Chloride and 80-120 ppm Sulfate with low to medium hardness (residual alkalinity).
You will usually want to add calcium chloride (calcium + chloride), gypsum (calcium + sulfate) and an acid (acidulated malt or lactic acid). The minerals will influence the taste. A beer with high sulfate (e.g. 150 ppm) may taste edgier and more bitter than a beer with medium chloride (eg. 60 ppm) and low sulfate (e.g. 20 ppm). The acidity of the mash is important for the proper functioning of the enzymes, prevention of extracting tannins and later during the boil for benefiting coagulation.
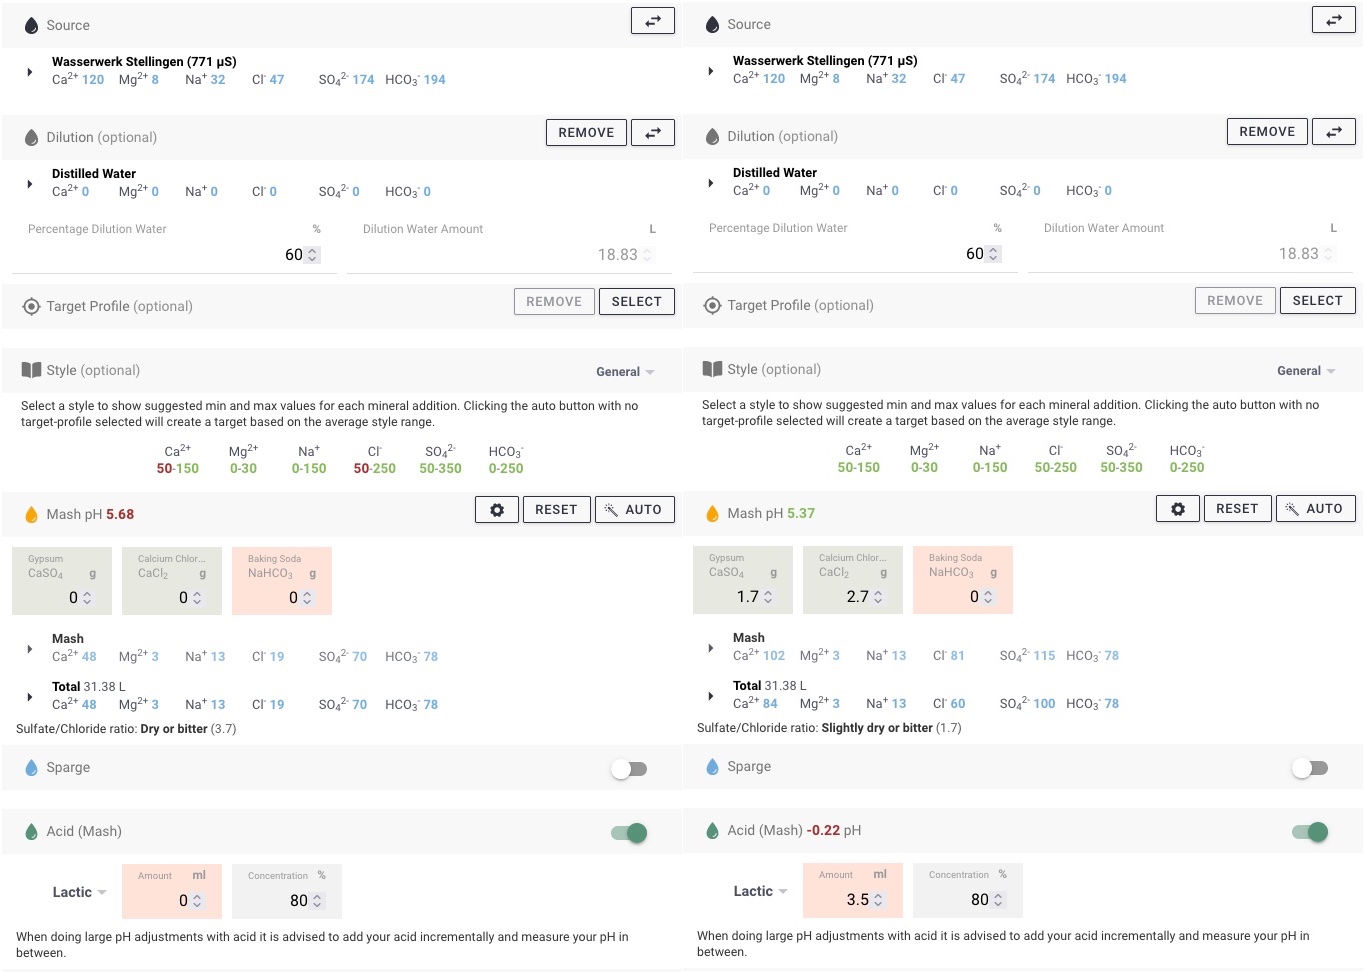
In the above example, you can see my source water which is hard and high in sulfate and not very suitable for brewing anything. If I dilute it with 60% distilled water (this is roughly equivalent to bringing down the conductivity of the water to 60% of its original value with a mixed bed ion exchanger) I get a good soft-medium hard base. Your mash pH should be in the range of 5.2 to 5.6. Without mineral additions and lactic acid addition, I'm still out of the mash pH range so I add minerals to reach my desired profile (60ppm Chloride, 100ppm Sulfate, >50ppm Calcium, low Magnesium and Sodium) and lactic acid to reach a mash pH somewhere in the middle of the range.
Factor 5: Balanced Recipes
I started brewing with a 5l full-grain kit and for the third brew (23l on a Grainfather) I already tried to build my own recipe. When I looked through all the descriptions of the malts in the homebrew shop I was thinking: I need that, and that, and that, ..., and ended up with 8 different malts in my beer. Don't be like me. Simple is (often) better. Some of the best lagers I made were made with very simple grist. For the beginning, I would recommend restricting yourself to 1-2 base malts and 1 specialty malt (optional). For a dark lager, this might need 1-2 more specialty malts.
Example grist of a simple Kellerbier
50% Pilsner malt (2.5kg)
50% Munich malt  (2.5kg)
~15 EBC at 12.9°P, 75% Brewhouse efficiency, 23l
The same is true for hops. I usually limit myself to two hops, sometimes a third if I use a dedicated bittering hop. For additions, I would recommend a bittering addition, a 10-minute addition and a flameout addition or a short hopstand.
Example hop schedule for a simple Kellerbier
25g Perle (10% AA) 60 min   27 IBU
25g Perle (10% AA) 10 min   10 IBU
50g Perle (10% AA)  0 min   ~1 IBU
(23l)                       38 IBU
It's fun to explore the distinct flavors of different hops. In most beers, I don't think that single-hop lagers lack something over lagers with multiple hops.
Balance is key
A good lager has a good balance between bitterness, hop flavor, maltiness and body. Try 45 IBU on a 100% Pils body, that's going to be out of balance. A Kellerbier with 15% light caramel malt could balance that out well. I prefer to brew my beers more bitter than average and my Kellerbier usually ends up in the range of 40-45 IBU. I also went for 20% caramel malt last time, despite hearing a lot of homebrewers saying "that's too much for a lager and it's not going to be drinkable". It was very drinkable, but it didn't taste as bitter as I would have thought. Try to find the perfect balance for your palate. Nobody is stopping you to brew a Märzen with 35 IBU. In fact, I had some commercial Märzens from Franconia that must have been in that IBU range and they were great.
Don't use 30% caramel malts with a mash temperature, that favors unfermentable sugars, and low bitterness it would be a very, malty sweet bomb.
Some people may like it but I believe the key to good lagers is drinkability.
Addendum: What wasn't mentioned
Some factors weren't mentioned so far. Some of these things will be addressed in another article that will point out my opinion about the difference between good and excellent lagers. But for the sake of preventing questions, I will address some more topics briefly:
Shiny 2500$ fermenters: You don't need the most expensive fermenters to have a proper fermentation.
3 Vessel HERMS System: Nice to have for consistency, but definitely not needed.
Lagering time: The best lagers I made tasted better after 2 weeks than the good ones that lagered 6-8 weeks. Flavor can change and often it's good to wait a few weeks (rule of thumb 1 week lagering per 2°P OG) but it's ready when it tastes good.
Beer clarity: I like the look of clear beers. Yeast in suspension can change the flavor. If it's properly fermented it shouldn't look like a NEIPA after a few weeks. Clarity is mostly personal preference.
Storage: Store your beer cold and dark. But that's true for every beer not only for lagers.
Boil time: I was convinced to boil for 90 minutes for light base malts after visiting an off-flavor seminar and perceiving low levels of DMS as normal. I've read and heard sources contradicting whether modern malts need a long boil or not.
Protein rest: Modern malts are well modified. I stopped doing protein rests and the foam didn't change for the worse. My best lagers have been brewed without protein rest.
Alpha Acid of bittering hops: Alpha Acid extract leaves behind the rest of the hop material and in an experiment, brewers were able to make a bitter beer with that residual material. I personally use lower and medium AA hops for bittering as well and believe it leads to a more rounded bitterness. For an 8% AA hop, I wouldn't add a bittering hop with high AA, for a 4% AA hop I would mix with some high AA hop.
Wort clarity: You don't need to rack over perfectly clear wort to the fermenter to get clear beer. Polyphenols and yeast will make your beer hazy and you can't stop them from coming in there. You should be careful to not rack over too many hop greens though.
Summary: Checklist for brewing a good lager
Assuming you want to brew a standard strength ~11-13°P 23l batch of lager:
- Have a fermentation chamber (fridge).
- Use a simple recipe. E.g. two malts, two hops.
- Get proper source water and use salts to reach >50ppm Calcium, 40-80ppm Chloride, 60-100ppm Sulfate and use acid to reach 5.4 mash Ph.
- Cool down the wort fast after boiling.
- When reaching 10°C/12°C pitch 2 respective 3 rehydrated packs of dried yeast (W-34/70).
- After 5 days of fermentation let the temperature rise to 14°C.
- When bubbling dies downs let the temperature rise to 18°C, and keep it there for 4 days to make sure fermentation is done and yeast had time to clean up diacetyl.
- Cold crash if you have a closable fermenter and can guarantee no oxygen will enter the beer.
- Bottle with a bottling wand, or keg with a closed transfer.
- Store cold for at least 2 weeks (more if you're patient). (In case of bottle conditioning the beer should be stored at room temperature for 2 weeks before cooling).
- Enjoy your lager and share it with me.
Send me feedback on this article on my Instagram: @hopload.